
Visual Studio Download 2019: How to Get the Best IDE for .NET and C++ Development
If you are looking for a powerful and comprehensive integrated development environment (IDE) for .NET and C++ development, you might want to consider Visual Studio 2019. In this article, we will show you what Visual Studio 2019 is, what features and benefits it offers, how to download and install it, and how to use it to create amazing apps.
What is Visual Studio 2019?
Visual Studio 2019 is the latest version of Microsoft’s flagship IDE for Windows and Mac. It supports a wide range of programming languages, such as C#, C++, VB.NET, F#, Python, Java, JavaScript, TypeScript, Node.js, and more. It also enables you to develop apps for various platforms, such as web, cloud, desktop, mobile, games, data science, machine learning, and AI.
Features and Benefits of Visual Studio 2019
Visual Studio 2019 is packed with a sweet array of tools and features that can elevate and enhance every stage of software development. Some of the main features and benefits are:
- Code editor: The code editor in Visual Studio 2019 is smart, fast, and intuitive. It provides features such as syntax highlighting, code completion, refactoring, formatting, debugging, testing, version control, and more.
- Code analysis: The code analysis in Visual Studio 2019 helps you write high-quality code that follows best practices and standards. It can detect and fix errors, warnings, suggestions, security issues, performance issues, style issues, and more.
- Code generation: The code generation in Visual Studio 2019 helps you write code faster and easier. It can generate boilerplate code, scaffolding code, snippets, templates, models, classes, methods, properties, constructors, getters, setters, and more.
- Code navigation: The code navigation in Visual Studio 2019 helps you find and jump to any part of your code quickly and easily. It can navigate to definitions, references, declarations, implementations, usages, symbols, files, types, members, namespaces, projects, solutions, and more.
- Code testing: The code testing in Visual Studio 2019 helps you ensure that your code works as expected and meets the requirements. It can run unit tests, integration tests, functional tests, performance tests, load tests, UI tests, code coverage tests, and more.
- Code debugging: The code debugging in Visual Studio 2019 helps you identify and fix bugs in your code efficiently and effectively. It can set breakpoints, watch variables, inspect values, evaluate expressions, step through code, modify code at runtime, and more.
- Code deployment: The code deployment in Visual Studio 2019 helps you publish your apps to various platforms easily and securely. It can deploy to local or remote servers, cloud services, containers, virtual machines, mobile devices, emulators, simulators, and more.
- Code collaboration: The code collaboration in Visual Studio 2019 helps you work with other developers on the same project seamlessly and productively. It can integrate with GitHub, Azure DevOps, Git, Team Foundation Server, and more.
Edition
Editions and Pricing of Visual Studio 2019
Visual Studio 2019 comes in three main editions: Community, Professional, and Enterprise. Each edition has different features and pricing options. Here is a brief comparison of the three editions:
| Edition | Features | Pricing |
|---|---|---|
| Community | Free for individual developers, open source projects, academic research, education, and small teams. Includes most of the features of Visual Studio 2019, such as code editor, code analysis, code generation, code navigation, code testing, code debugging, code deployment, and code collaboration. | Free |
| Professional | For professional developers who work in small or medium-sized organizations. Includes all the features of Community edition, plus advanced tools and services for designing, developing, and testing applications. | $45 per month or $1,199 for the first year |
| Enterprise | For enterprise developers who work in large or complex organizations. Includes all the features of Professional edition, plus premium tools and services for building, managing, and delivering applications at scale. | $250 per month or $5,999 for the first year |
You can also try Visual Studio 2019 for free for 30 days before you buy it. You can download the trial version from the official website.
How to Download and Install Visual Studio 2019
Downloading and installing Visual Studio 2019 is easy and straightforward. Just follow these steps:
System Requirements for Visual Studio 2019
Before you download and install Visual Studio 2019, make sure that your system meets the minimum requirements for running the IDE. Here are the system requirements for Visual Studio 2019:
- Operating system: Windows 10 version 1703 or higher; Windows Server 2016 or higher; Windows Server 2012 R2 (with Update 2919355); Windows Server 2012 (with Update 2919355); Windows Server 2008 R2 SP1; macOS Catalina 10.15 or higher.
- Processor: 1.8 GHz or faster processor; quad-core or better recommended.
- Memory: Minimum of 4 GB of RAM; 8 GB of RAM recommended (2.5 GB minimum if running on a virtual machine).
- Hard disk space: Minimum of 800 MB up to 210 GB of available space, depending on features installed; typical installations require 20-50 GB of free space.
- Graphics card: DirectX 9-capable video card that runs at 1024 x 768 or higher display resolution.
- Internet connection: Required for installation and updates.
- Addition
- Additional requirements: Some features of Visual Studio 2019 may require additional components, such as .NET Framework, .NET Core, C++ Redistributable, Java Development Kit, Python, Node.js, and more. You can check the full list of additional requirements on the official website.
Download Options for Visual Studio 2019
Once you have verified that your system meets the requirements, you can proceed to download Visual Studio 2019 from the official website. You have two main options for downloading Visual Studio 2019:
- Visual Studio Installer: This is the recommended option for most users. It allows you to download and install Visual Studio 2019 with a graphical user interface. You can choose which edition, features, and components you want to install, and customize your installation according to your preferences and needs.
- Visual Studio Bootstrapper: This is an alternative option for advanced users. It allows you to download and install Visual Studio 2019 with a command-line interface. You can use various parameters and switches to control the installation process, and automate or script your installation for multiple machines.
Installation Steps for Visual Studio 2019
After you have downloaded Visual Studio 2019, you can follow these steps to install it on your system:
- Run the installer: Depending on which download option you chose, run the Visual Studio Installer or the Visual Studio Bootstrapper file that you downloaded. You may need to accept the User Account Control prompt and the license terms before proceeding.
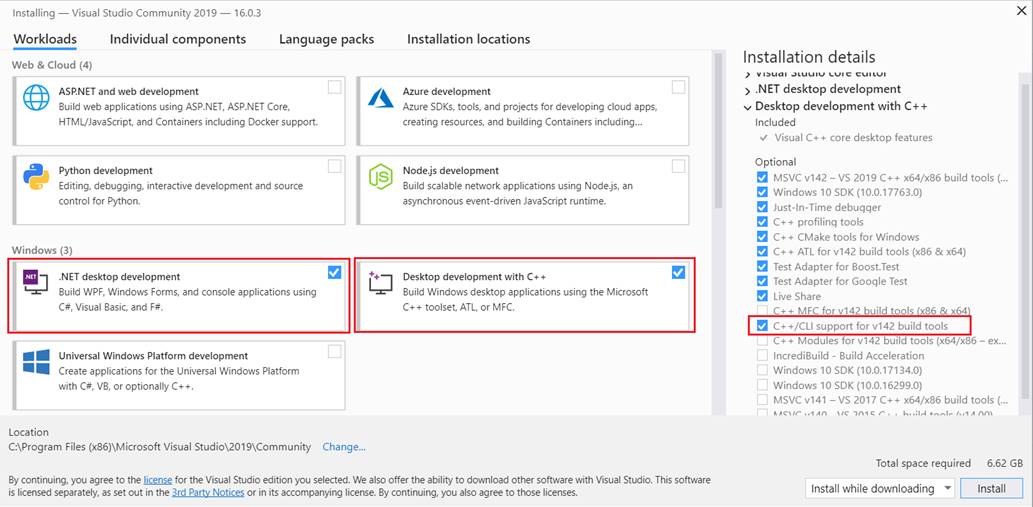
- Select the workload: If you are using the Visual Studio Installer, you will see a list of workloads that represent different types of development. You can select one or more workloads that suit your project needs, such as .NET desktop development, ASP.NET and web development, C++ desktop development, Mobile development with .NET, Game development with Unity, Data science and analytical applications, and more. Each workload will include the essential tools and components for that type of development. You can also select individual components from the list on the right side of the installer.
- Install the workload: After you have selected the workload, click on the Install button at the bottom right corner of the installer. The installer will start downloading and installing the selected workload and components. You can monitor the progress and status of the installation on the installer window. The installation may take some time depending on your internet speed and system performance.
- Launch Visual Studio 2019: Once the installation is complete, you can launch Visual Studio 2019 from the Start menu or the desktop shortcut. You may need to sign in with your Microsoft account or create one if you don’t have one already. You can also customize your development environment by choosing a theme, a layout, and other settings.
How to Use Visual Studio 2019
Congratulations! You have successfully downloaded and installed Visual Studio 2019 on your system. Now you are ready to use it to create amazing apps. Here are some basic steps on how to use Visual Studio 2019:
Creating and Opening Projects in Visual Studio 2019
A project in Visual Studio 2019 is a collection of files that contain your code, resources, settings, and other information related to your app. A solution in Visual Studio 2019 is a container that holds one or more projects that are related to each other.
To create a new project in Visual Studio 2019, follow these steps:
- Select File > New > Project: This will open a dialog box where you can choose a template for your project based on the language, platform, and type of app you want to create.
- Select a template: You can browse through the list of templates or use the search box to find one that matches your needs. For example, if you want to create a C# console app for Windows, you can select Console App (.NET Core) from the list.
- Name and location: After you have selected a template, you can enter a name for your project and choose a location where you want to save it. You can also change other options such as the solution name, framework version, target platform, etc.
- Create: Click on the Create button to create your project. Visual Studio 2019 will generate the necessary files and folders for your project and open it in the IDE.
To open an existing project in Visual Studio 2019, follow these steps:
- Select File > Open > Project/Solution: This will open a dialog box where you can browse to the location where your project or solution is saved.
- Select a project or solution file: You can select a project file (such as .csproj, .vbproj, .vcxproj, etc.) or a solution file (such as .sln) that you want to open. You can also use the search box to find a file by name.
- Open: Click on the Open button to open your project or solution in Visual Studio 2019. The IDE will load the files and folders for your project or solution and display them in the Solution Explorer window.
- Syntax highlighting: The code editor window uses different colors and fonts to distinguish different elements of your code, such as keywords, variables, strings, comments, etc. This makes your code more readable and understandable.
- Code completion: The code editor window provides suggestions and recommendations for completing your code as you type. For example, if you type a dot (.) after an object name, the code editor window will show a list of methods and properties that you can use with that object. You can select an item from the list by pressing the Tab key or clicking on it with the mouse.
- Code refactoring: The code editor window allows you to perform various actions to improve the quality and structure of your code, such as renaming variables, extracting methods, changing signatures, moving types, etc. You can access these actions by right-clicking on a code element and selecting Quick Actions and Refactorings from the context menu.
- Code formatting: The code editor window helps you format your code according to the coding standards and conventions for your language and project. You can format your code by pressing Ctrl+K+D (for document) or Ctrl+K+F (for selection), or by selecting Edit > Advanced > Format Document/Selection from the menu bar.
- Code navigation: The code editor window enables you to navigate to any part of your code quickly and easily. You can use various shortcuts and commands to jump to definitions, references, declarations, implementations, usages, symbols, files, types, members, namespaces, projects, solutions, and more.
- Breakpoints: Breakpoints are markers that you can set in your code to pause the execution of your app at a specific line or location. You can use breakpoints to inspect the values of variables, evaluate expressions, modify code at runtime, and more. You can set breakpoints by clicking on the left margin of the code editor window or by pressing F9.
- Watch windows: Watch windows are panels that display the values of variables or expressions that you want to monitor during debugging. You can use watch windows to add, edit, remove, or evaluate variables or expressions that are relevant to your debugging session. You can access watch windows by selecting Debug > Windows > Watch from the menu bar.
- Data tips: Data tips are pop-up windows that show the values of variables or expressions when you hover over them with the mouse cursor during debugging. You can use data tips to quickly check the values of variables or expressions without opening a watch window or using a breakpoint.
- Debug console: The debug console is a window that allows you to interact with your app during debugging by entering commands or expressions. You can use the debug console to execute commands or expressions, print messages, change values, call functions, and more. You can access the debug console by selecting Debug > Windows > Immediate from the menu bar.
- Test explorer:
- Test explorer: The test explorer is a window that displays the list of tests that you have created or imported for your app. You can use the test explorer to run, debug, analyze, and manage your tests. You can access the test explorer by selecting Test > Windows > Test Explorer from the menu bar.
- Build menu: The build menu is where you can access the commands and options for building your app. You can use the build menu to build, rebuild, clean, or cancel your app. You can also configure the build settings, such as the configuration, platform, output path, etc.
- Publish menu: The publish menu is where you can access the commands and options for publishing your app. You can use the publish menu to publish your app to a local or remote server, a cloud service, a container, a virtual machine, a mobile device, an emulator, a simulator, or any other supported platform or device.
- Publish profiles: Publish profiles are files that store the settings and options for publishing your app to a specific target. You can create, edit, delete, or import publish profiles for your app. You can also use publish profiles to automate or script your publishing process.
- Publish wizard: The publish wizard is a dialog box that guides you through the steps of publishing your app to a selected target. You can use the publish wizard to choose a target, configure the settings, validate the connection, preview the changes, and publish your app.
- We introduced Visual Studio 2019 as the latest version of Microsoft’s flagship IDE for Windows and Mac.
- We explained what features and benefits Visual Studio 2019 offers for .NET and C++ development.
- We compared the editions and pricing of Visual Studio 2019: Community, Professional, and Enterprise.
- We showed how to download and install Visual Studio 2019 using either the Visual Studio Installer or the Visual Studio Bootstrapper.
- We showed how to create and open projects in Visual Studio 2019 using various templates and languages.
- We showed how to write and edit code in Visual Studio 2019 using various tools and features such as code editor, code analysis, code generation, code navigation, code refactoring, code formatting, etc.
- We showed how to debug and test code in Visual Studio 2019 using various tools and features such as breakpoints, watch windows, data tips, debug console, test explorer, etc.
- We showed how to build and deploy apps in Visual Studio 2019 using various tools and features such as build menu, publish menu, publish profiles, publish wizard, etc.
- Q: How do I update Visual Studio 2019?
- A: You can update Visual Studio 2019 by selecting Help > Check for Updates from the menu bar. The Visual Studio Installer will check for any available updates and prompt you to install them.
- Q: How do I uninstall Visual Studio 2019?
- A: You can uninstall Visual Studio 2019 by selecting Tools > Get Tools and Features from the menu bar. The Visual Studio Installer will open and show you the list of installed components. You can select the components that you want to uninstall and click on the Modify button at the bottom right corner of the installer. The installer will start uninstalling the selected components.
- Q: How do I get
- Q: How do I get help and support for Visual Studio 2019?
- A: You can get help and support for Visual Studio 2019 by selecting Help > View Help from the menu bar. This will open the Visual Studio documentation website, where you can find tutorials, guides, references, samples, videos, blogs, forums, and more. You can also use the search box to find specific topics or keywords.
- Q: How do I learn more about Visual Studio 2019?
- A: You can learn more about Visual Studio 2019 by visiting the official website, where you can find the latest news, updates, features, events, webinars, podcasts, and more. You can also follow Visual Studio on social media platforms such as Twitter, Facebook, YouTube, LinkedIn, and Instagram.
- Q: How do I provide feedback or suggestions for Visual Studio 2019?
- A: You can provide feedback or suggestions for Visual Studio 2019 by selecting Help > Send Feedback from the menu bar. This will open a dialog box where you can choose to report a problem, provide a suggestion, or rate your experience. You can also use the smiley face icon at the top right corner of the IDE to send feedback or suggestions.
Writing and Editing Code in Visual Studio 2019
Once you have created or opened a project in Visual Studio 2019, you can start writing and editing code in the code editor window. The code editor window is where you can type, modify, format, and organize your code. The code editor window has many features and tools that can help you write and edit code faster and easier. Some of the main features and tools are:
Debugging and Testing Code in Visual Studio 2019
After you have written and edited your code in Visual Studio 2019, you can debug and test it to ensure that it works as expected and meets the requirements. Debugging and testing are essential steps in software development that can help you identify and fix errors, bugs, and defects in your code. Visual Studio 2019 provides many tools and features that can help you debug and test your code effectively and efficiently. Some of the main tools and features are:
Building and Deploying Apps in Visual Studio 2019
When you have finished debugging and testing your code in Visual Studio 2019, you can build and deploy your app to various platforms and devices. Building and deploying are the final steps in software development that can help you deliver your app to your end users or customers. Visual Studio 2019 provides many tools and features that can help you build and deploy your app easily and securely. Some of the main tools and features are:
Conclusion
In this article, we have shown you how to download and install Visual Studio 2019, the best IDE for .NET and C++ development. We have also shown you how to use Visual Studio 2019 to create, edit, debug, test, build, and deploy amazing apps for various platforms and devices. We hope that this article has helped you get started with Visual Studio 2019 and that you enjoy using it for your software development projects.
Summary of the Article
Here is a summary of what we have covered in this article:
FAQs
Here are some frequently asked questions about Visual Studio 2019:
bc1a9a207d