
Download File ✒ https://urluss.com/2uTSIH
Yellow Lightroom Presets: How to Add a Warm and Sunny Glow to Your Photos
Do you want to make your photos look more vibrant, cheerful, and eye-catching? Do you want to save time and effort in editing your photos with a consistent style? Do you want to learn how to use one of the most popular and powerful photo editing software in the market?
If you answered yes to any of these questions, then you are in the right place. In this article, we will show you how to use yellow lightroom presets to enhance your photos with a warm and sunny glow. We will also introduce you to Editz presets, a collection of free and premium lightroom presets that you can download and use with one click.
By the end of this article, you will be able to:
- Understand what are lightroom presets and why use them
- Know how to download, install, and apply lightroom presets
- Discover yellow lightroom presets and how they can transform your photos
- Find out how to get free yellow lightroom presets from Editz
- See examples of yellow lightroom presets from Editz
What are Lightroom Presets and Why Use Them?
Before we dive into yellow lightroom presets, let’s first understand what are lightroom presets and why use them.
Lightroom Presets Definition
A lightroom preset is a file that applies specific effects and adjustments to your photos with a single click. It is like an advanced filter that can change settings like color, brightness, contrast, and more. It can save time, create consistency, and improve style. They are customizable and can be used for both Adobe Lightroom CC & Classic CC (xmp files) and the Adobe Lightroom Free App version (dng files). They are available as free or premium presets for various types of creative professionals.
Benefits of Lightroom Presets
There are many benefits of using lightroom presets, such as:
- They save time by making lots of edits with a single click, so that you can skip straight to fine-tuning.
- They create consistency by applying the same edits repeatedly to different photos, which is especially useful for batch editing or creating a uniform theme for a project.
- They simplify the editing process by eliminating the need to figure out what combinations of settings work best for each photo. You can just choose a preset that suits your desired look and mood.
- They customize the style of your photos by allowing you to experiment with different looks and effects that you might not be able to achieve otherwise. You can also create your own presets or modify existing ones to suit your personal taste.
- They help you learn the software by showing you how different editing controls affect your photos. You can also see how other professionals edit their photos by using their presets.
How to Use Lightroom Presets
Now that you know what are lightroom presets and why use them, let’s see how to use them.
How to Download Lightroom Presets
The first step is to find and download lightroom presets that you like. There are many sources online where you can find free or paid lightroom presets for various genres and styles of photography. Some examples are:
- [TrickyPhotoshop](^1^): A website that offers free yellow tone preset for lightroom that gives a warm and sunny effect to your photos.
- [Dakolor](^2^): A website that offers free yellow lightroom preset by Polengshow that adds a yellow tint to your photos.
- [PresetLove](^3^): A website that offers free yellow film preset for lightroom that replicates an old film look with a warm yellow overlay.
You can also search for more free yellow lightroom presets online or create your own by adjusting the color temperature, tint, saturation, and other settings in lightroom.
How to Install and Apply Lightroom Presets
The next step is to install and apply the lightroom presets that you have downloaded. The process may vary depending on the version of lightroom that you are using and the format of the presets that you have downloaded. Here are some general steps that you can follow:
- Open lightroom and go to the develop module.
- On the left panel, click on the + icon next to the presets tab and select import presets.
- Browse and select the preset files that you have downloaded and click import.
- The presets will appear in the presets tab under the folder name of the preset pack or the individual preset name.
- To apply a preset, simply click on it and see how it changes your photo. You can also preview the effect by hovering over the preset name.
- You can adjust the intensity of the preset by using the opacity slider at the top of the presets tab.
- You can also fine-tune the settings of the preset by using the editing controls on the right panel.
Yellow Lightroom Presets: Free Download 1 Click – Editz Presets
Now that you know how to use lightroom presets, let’s explore yellow lightroom presets and how they can add a warm and sunny glow to your photos. We will also introduce you to Editz presets, a collection of free and premium lightroom presets that you can download and use with one click.
What are Yellow Lightroom Presets?
Yellow lightroom presets are presets that add a yellow hue or tone to your photos. They can make your photos look more vibrant, cheerful, and eye-catching. They can also create a warm and sunny atmosphere that evokes feelings of happiness, optimism, and energy. They are ideal for photos taken in natural light, especially during golden hour or sunset. They can also work well for photos with greenery, flowers, or other colorful elements.
Yellow lightroom presets can vary in intensity, contrast, saturation, and other settings depending on the style and mood that you want to achieve. Some yellow lightroom presets may be more subtle and soft, while others may be more bold and dramatic. Some may have a vintage or retro feel, while others may have a modern or trendy look. Some may have a matte or faded effect, while others may have a crisp or clear effect. The possibilities are endless.
How to Download and Use Editz Presets
If you are looking for high-quality yellow lightroom presets that you can download and use with one click, then you should check out Editz presets. Editz presets is a collection of free and premium lightroom presets created by professional photographers and editors. They offer a variety of genres and styles of photography, such as portrait, landscape, travel, wedding, food, fashion, and more. They also offer a range of colors and tones, such as yellow, orange, pink, blue, green, black and white, and more.
To download and use Editz presets, you just need to follow these simple steps:
- Go to [Editz Presets] website and browse their catalog of free and premium lightroom presets.
- Select the preset pack or the individual preset that you like and click on it.
- Read the description and see the before-and-after examples of the preset.
- If it is a free preset, click on the download button and enter your email address to receive the preset file. If it is a premium preset, click on the buy now button and complete the payment process to receive the preset file.
- Once you have received the preset file, follow the instructions on how to install and apply it in lightroom.
- Enjoy your new yellow lightroom preset from Editz!
Examples of Yellow Lightroom Presets from Editz
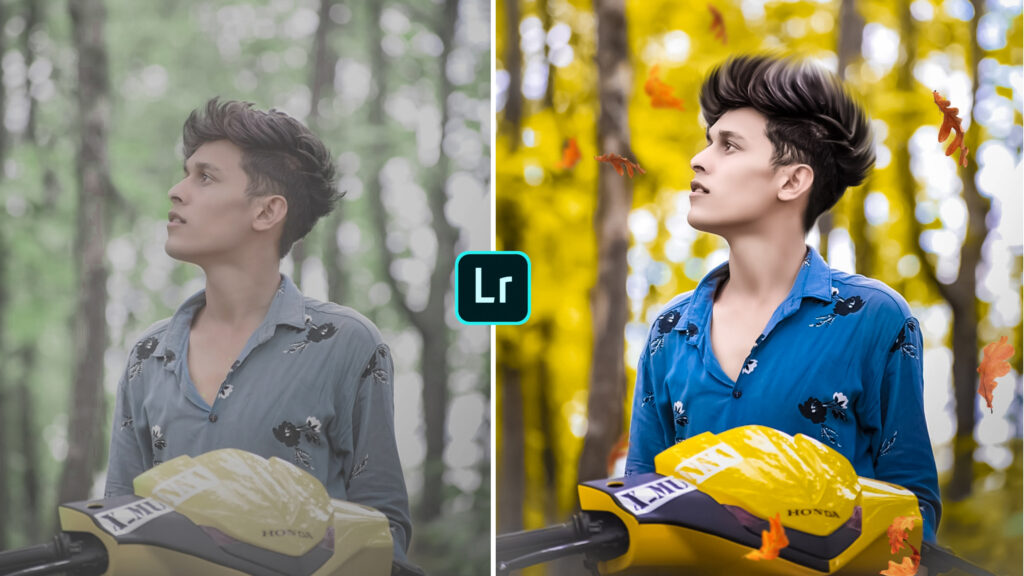
To give you an idea of how yellow lightroom presets from Editz can transform your photos, here are some examples of before-and-after images using their free yellow tone preset for lightroom:
| Before | After |
As you can see, the yellow tone preset from Editz adds a warm and sunny glow to the photos, making them more appealing and attractive. You can also try other yellow lightroom presets from Editz, such as the yellow film preset, the yellow vintage preset, or the yellow summer preset.
Conclusion
In conclusion, yellow lightroom presets are a great way to enhance your photos with a warm and sunny glow. They can make your photos look more vibrant, cheerful, and eye-catching. They can also create a warm and sunny atmosphere that evokes feelings of happiness, optimism, and energy. They are ideal for photos taken in natural light, especially during golden hour or sunset. They can also work well for photos with greenery, flowers, or other colorful elements.
To use yellow lightroom presets, you just need to download, install, and apply them in lightroom. You can find many free or paid yellow lightroom presets online or create your own by adjusting the color temperature, tint, saturation, and other settings in lightroom. You can also check out Editz presets, a collection of free and premium lightroom presets that you can download and use with one click. They offer a variety of genres and styles of photography, such as portrait, landscape, travel, wedding, food, fashion, and more. They also offer a range of colors and tones, such as yellow, orange, pink, blue, green, black and white, and more.
We hope that this article has helped you learn how to use yellow lightroom presets to add a warm and sunny glow to your photos. If you have any questions or feedback, please feel free to leave a comment below. Happy editing!
FAQs
Here are some frequently asked questions about yellow lightroom presets:
- What is the difference between lightroom presets and filters?
- How do I create my own yellow lightroom preset?
- How do I share my yellow lightroom preset with others?
- How do I delete my yellow lightroom preset from lightroom?
- Where can I find more free yellow lightroom presets?
A filter is a simple effect that applies the same settings to every photo regardless of its original condition. A preset is a more advanced effect that applies specific settings to each photo based on its exposure, color balance, contrast, and other factors. A preset can also be customized and fine-tuned to suit your personal preference.
To create your own yellow lightroom preset, you need to open a photo in lightroom and adjust the settings that affect the color of your photo. The most important settings are the color temperature, tint, saturation, vibrance, split toning, and calibration. You can also adjust other settings like exposure, contrast, clarity, sharpening, noise reduction, etc. Once you are happy with the result, you can save your settings as a new preset by clicking on the + icon next to the presets tab and naming your preset.
To share your yellow lightroom preset with others, you need to export your preset file from lightroom and send it to them via email or other methods. To export your preset file from lightroom, you need to right-click on your preset name in the presets tab and select show in finder (Mac) or show in explorer (Windows). This will open the folder where your preset file is stored. You can then copy or move your preset file to another location or device.
To delete your yellow lightroom preset from lightroom, you need to right-click on your preset name in the presets tab and select delete. This will remove your preset from lightroom but not from your computer. To delete your preset file from your computer, you need to follow the same steps as exporting your preset file from lightroom and then delete it from the folder where it is stored.
You can find more free yellow lightroom presets online by searching for keywords like “free yellow lightroom presets”, “free warm lightroom presets”, “free sunny lightroom presets”, etc. You can also visit [Editz Presets] website and browse their catalog of free and premium lightroom presets. They have a lot of yellow lightroom presets that you can download and use with one click.
bc1a9a207d